Monday, February 10, 2025

HP Ink Tank 5810,5820,419,500,521,570,310, 410 printers


एचपी इंकटैंक प्रिंटर के बारे में जानकारी

एचपी इंकटैंक प्रिंटर, एचपी कंपनी द्वारा निर्मित प्रिंटर की एक श्रृंखला है जो स्याही टैंक प्रणाली का उपयोग करते हैं। ये प्रिंटर उन लोगों के लिए डिज़ाइन किए गए हैं जिन्हें कम लागत पर बड़ी मात्रा में प्रिंटिंग करने की आवश्यकता होती है।

एचपी इंकटैंक प्रिंटर के लाभ

  • कम लागत: एचपी इंकटैंक प्रिंटर में स्याही की लागत पारंपरिक कार्ट्रिज प्रिंटर की तुलना में बहुत कम होती है। स्याही की बोतलें अधिक समय तक चलती हैं और उनकी कीमत कार्ट्रिज की तुलना में कम होती है।
  • उच्च क्षमता: एचपी इंकटैंक प्रिंटर एक बार में बड़ी मात्रा में स्याही स्टोर कर सकते हैं, जिससे आपको बार-बार स्याही बदलने की आवश्यकता नहीं होती है।
  • उच्च गुणवत्ता: एचपी इंकटैंक प्रिंटर उच्च गुणवत्ता वाले प्रिंट प्रदान करते हैं जो स्पष्ट और जीवंत होते हैं।
  • विभिन्न मॉडल उपलब्ध: एचपी विभिन्न प्रकार के इंकटैंक प्रिंटर मॉडल पेश करता है, ताकि आप अपनी आवश्यकताओं के अनुसार सबसे अच्छा मॉडल चुन सकें।

एचपी इंकटैंक प्रिंटर के नुकसान

  • प्रारंभिक लागत: एचपी इंकटैंक प्रिंटर की प्रारंभिक लागत पारंपरिक कार्ट्रिज प्रिंटर की तुलना में अधिक होती है।
  • रखरखाव: एचपी इंकटैंक प्रिंटर को नियमित रखरखाव की आवश्यकता होती है, जैसे कि प्रिंटहेड को साफ करना और स्याही टैंक को भरना।

एचपी इंकटैंक प्रिंटर खरीदते समय

  • अपनी प्रिंटिंग की आवश्यकताएँ: आपको अपनी प्रिंटिंग की आवश्यकताओं पर विचार करना चाहिए, जैसे कि आप कितनी बार प्रिंट करते हैं, आप किस प्रकार के दस्तावेज़ प्रिंट करते हैं, और आपको रंगीन प्रिंटिंग की आवश्यकता है या नहीं।
  • प्रिंटर की विशेषताएं: आपको प्रिंटर की विशेषताओं पर विचार करना चाहिए, जैसे कि प्रिंट गति, प्रिंट रिज़ॉल्यूशन, और कनेक्टिविटी विकल्प।
  • कीमत: आपको प्रिंटर की कीमत पर भी विचार करना चाहिए। एचपी इंकटैंक प्रिंटर की कीमत पारंपरिक कार्ट्रिज प्रिंटर की तुलना में अधिक होती है, लेकिन स्याही की कम लागत के कारण, वे लंबे समय में अधिक किफायती होते हैं।

कुछ लोकप्रिय एचपी इंकटैंक प्रिंटर मॉडल

  • एचपी स्मार्ट टैंक 580
  • एचपी स्मार्ट टैंक 530
  • एचपी स्मार्ट टैंक 515
  • एचपी इंक टैंक वायरलेस 415
आइये आब समझते है इस प्रिंटर के दूसरे पार्ट को यानि इसके error code को । 
HP inktank printer error code 
इसके error code को समझने से पहले इसके कंट्रोल pannel सिस्टम पे एक नजर डालते है 
Figure 1 : Control panel buttons and lights


  1. Control panel display
  2. Cancel button
  3. Wireless button/light
  4. Wi-Fi Direct button/status light
  5. Start Copy Color button
  6. Power button/light
  7. Printhead Alert light
  8. Resume button/light
  9. Information button/light
  10. HP ePrint button/light
  11. Start Copy Black button
  12. Figure 2 : Control panel icons


    1. Number of Copies icon
    2. Error icon
    3. Paper Error icon
    4. Wi-Fi Direct icon
    5. Wireless icon
    6. Wireless Attention icon
    7. Signal Bars icon
    8. Printhead icons

प्रिंटर मे जब भी कोई समस्या आएगी तो डिस्प्ले मे जहा 0 है वो बादल कर कुछ ओर blink करेगा 
like ------- E1 , E2 , E3
इसे हम error code कहते है । 

क्या है error codes ?

आइये जानते है error code के बारे मे -----
  
निम्नलिखित अनुभाग control pannel  पर दिखाई देने वाली blinking light  के संयोजनों के साथ सबसे आम error  स्थितियों का वर्णन करते हैं, जिसके बाद प्रत्येक problem  के समाधान दिए गए हैं। आप जिस ब्लिंकिंग लाइट पैटर्न का अनुभव कर रहे हैं, उसे ढूंढें और फिर समस्या को हल करने के लिए चरणों का पालन करें।

 E 1 - An E1 error occurs when the paper settings in the print driver do not match the paper  
        loaded in the printer.
E 2 - An E2 error occurs when the printer attempts to print a single-page or multi-page print job, and the paper length selected in the print settings does not match the length of the loaded paper. The printer then prints out the first page with errors.
NOTE: 
The Error icon, Paper Error icon, and Resume light blink when a multi-page print job is attempted.
You can resolve the error by canceling the print job, and then changing the print settings in the printing software.
  1. Press the Cancel button  to cancel the print job or clear the error.
  2. E 3 - An E3 error occurs when there is a printer carriage jam.
    Go to An 'E3' Error (Carriage Jam) for information to clear a printer carriage jam.
    Figure : Number of copies alternates between 'E' and '3,' and the Resume light blinks
    Image: Carriage jam light pattern
  3. E 4 - An E4 error occurs when there is a paper jam.
    Go to 'E4' Error (Paper Jam) for information to clear a paper jam.
    Figure : Number of Copies icon alternates between 'E' and '4,' and the Error icon, Paper Error icon, Resume light, and Ink Alert light blink
    Image: Paper Jam light pattern
  4. E 5 - An E5 error occurs when the printer experiences a scanning error.
    Figure : The Number of Copies icon alternates between E and 5, and all lights on the control panel blink
    Image: Scan error
  5. E 6 - An E6 error occurs when the printer is in an error state.
    Figure : Number of Copies icon alternates between 'E' and '6,' and all the lights blink
    Image: Error state light pattern
  6. Step 1: Reset the printer

    Resetting the printer can clear the error state.
    1. With the printer turned on, disconnect the power cord from the printer.
    2. Unplug the power cord from the power source.
    3. Wait 60 seconds.
    4. Reconnect the power cord to a wall outlet and to the printer.
      NOTE: 
      HP recommends plugging the printer directly into a wall outlet.

    Step 2: Plug the printer directly into an electrical outlet

    Plug the product directly into an electrical outlet to make sure that the power source functions correctly.
    1. Disconnect the power cord from the rear of the product.
    2. Unplug the power cord from any power strips or surge suppressors.
    3. Plug the power cord directly into an electrical outlet.
    4. Reconnect the power cord to the rear of the product.
    5. Press the Power button to turn on the product.
    6. Try the task again.
      If the issue persists, try a different electrical outlet.

    Step 3: Service the printer

    If you have completed all the previous steps and the issue persists, continue to the Service the printer section at the end of this document.
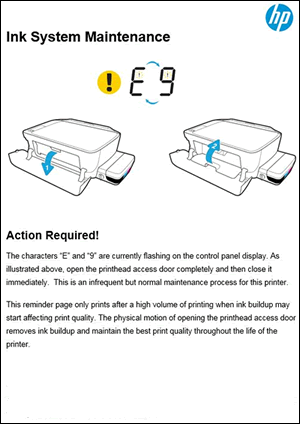
  7. E 9 - An E9 error occurs when the printer detects that ink system maintenance is required. An Ink System Maintenance page prints containing instructions to open and close the printhead access door to resolve the error.
  8. Figure : Ink System Maintenance page
    Ink System Maintenance page  
  9. Service the printer

    Service or replace your HP product if the issue persists after completing all the preceding steps.
    Go to Contact HP Customer Support to schedule a product repair or replacement. If you are in Asia Pacific, you will be directed to a local service center in your area.
    To confirm your warranty status, go to HP Product Warranty Check. Repair fees might apply for out-of-warranty products.

निष्कर्ष

एचपी इंकटैंक प्रिंटर उन लोगों के लिए एक बढ़िया विकल्प हैं जिन्हें कम लागत पर बड़ी मात्रा में प्रिंटिंग करने की आवश्यकता होती है। हालांकि, उनकी प्रारंभिक लागत अधिक होती है और उन्हें नियमित रखरखाव की आवश्यकता होती है। एचपी इंकटैंक प्रिंटर खरीदते समय, अपनी प्रिंटिंग आवश्यकताओं, प्रिंटर की विशेषताओं और कीमत पर विचार करना महत्वपूर्ण है।


Tech freelancer


Thursday, January 30, 2025

Random Shutdowns Or The BSOD

 ब्लू स्क्रीन ऑफ डेथ (BSOD)


ब्लू स्क्रीन ऑफ डेथ (BSOD), जिसे स्टॉप एरर या क्रैश स्क्रीन के नाम से भी जाना जाता है, एक एरर मैसेज है जो विंडोज ऑपरेटिंग सिस्टम वाले कंप्यूटर पर तब दिखाई देता है जब सिस्टम एक गंभीर समस्या का पता लगाता है जिससे वह सामान्य रूप से काम करना बंद कर देता है। यह एक गंभीर समस्या का संकेत है जिसके लिए तत्काल ध्यान देने की आवश्यकता होती है।

BSOD के कारण:

BSOD कई कारणों से हो सकता है, जिनमें शामिल हैं:

  • ड्राइवर समस्याएँ: पुराने, दूषित या गलत ड्राइवर सबसे आम कारणों में से एक हैं।
  • हार्डवेयर समस्याएँ: RAM, हार्ड ड्राइव, ग्राफिक्स कार्ड, या अन्य घटकों में खराबी।
  • सॉफ्टवेयर समस्याएँ: नए इंस्टॉल किए गए सॉफ़्टवेयर या अपडेट में बग।
  • ओवरहीटिंग: कंप्यूटर के अंदर के हिस्से बहुत गर्म हो जाते हैं।
  • वायरस या मैलवेयर: हानिकारक सॉफ़्टवेयर सिस्टम फ़ाइलों को दूषित कर सकते हैं।
  • सिस्टम फ़ाइलें दूषित: विंडोज की महत्वपूर्ण फाइलें क्षतिग्रस्त हो सकती हैं।

BSOD का समाधान कैसे करें:

BSOD का समाधान करने के लिए, आपको समस्या के कारण का पता लगाना होगा। यहाँ कुछ सामान्य समाधान दिए गए हैं:

  1. एरर कोड नोट करें: BSOD के दौरान, एक स्टॉप कोड या एरर कोड दिखाई देता है। इसे नोट करें, क्योंकि यह समस्या की पहचान करने में मदद कर सकता है। ऑनलाइन इस कोड को सर्च करने से आपको विशिष्ट समाधान मिल सकते हैं।

  2. हाल ही में किए गए बदलावों को अनडू करें: यदि BSOD किसी विशेष सॉफ़्टवेयर को इंस्टॉल करने या हार्डवेयर बदलने के बाद दिखाई देना शुरू हुआ, तो उन बदलावों को अनडू करें।

  3. अपने कंप्यूटर को रीस्टार्ट करें: यह एक सरल उपाय है, लेकिन कभी-कभी यह अस्थायी समस्याओं को ठीक कर सकता है।

  4. सुरक्षित मोड में बूट करें: सुरक्षित मोड में बूट करने से विंडोज केवल आवश्यक ड्राइवरों और सेवाओं के साथ शुरू होता है। यदि आपका कंप्यूटर सुरक्षित मोड में ठीक से चलता है, तो समस्या ड्राइवर या सॉफ़्टवेयर में हो सकती है।

  5. ड्राइवरों को अपडेट करें: पुराने या दूषित ड्राइवर BSOD का कारण बन सकते हैं। डिवाइस मैनेजर में जाकर अपने ड्राइवरों को अपडेट करें। विशेष रूप से ग्राफिक्स कार्ड, नेटवर्क एडेप्टर और चिपसेट ड्राइवरों को अपडेट करना महत्वपूर्ण है।

  6. हार्डवेयर की जाँच करें: RAM और हार्ड ड्राइव में खराबी BSOD का कारण बन सकती है। आप मेमोरी डायग्नोस्टिक टूल और चेक डिस्क यूटिलिटी का उपयोग करके इनकी जाँच कर सकते हैं।

  7. वायरस स्कैन करें: अपने कंप्यूटर को एंटीवायरस सॉफ़्टवेयर से स्कैन करें।

  8. सिस्टम फ़ाइल चेकर चलाएँ: सिस्टम फ़ाइल चेकर (SFC) टूल विंडोज की दूषित सिस्टम फ़ाइलों को ठीक करने में मदद कर सकता है। कमांड प्रॉम्प्ट में sfc /scannow टाइप करें और एंटर दबाएँ।

  9. विंडोज को रीइंस्टॉल करें: यदि अन्य सभी उपाय विफल हो जाते हैं, तो विंडोज को रीइंस्टॉल करना अंतिम उपाय हो सकता है। यह ध्यान रखें कि इससे आपका सारा डेटा मिट जाएगा, इसलिए पहले बैकअप बना लें।

अतिरिक्त सुझाव:

  • ओवरहीटिंग से बचें: सुनिश्चित करें कि आपके कंप्यूटर में उचित वेंटिलेशन है और उसके अंदर धूल जमा नहीं है।
  • अपने कंप्यूटर को नियमित रूप से अपडेट करें: विंडोज अपडेट में अक्सर बग फिक्स और सुरक्षा पैच शामिल होते हैं जो BSOD को रोकने में मदद कर सकते हैं।

यदि आपको BSOD का समाधान करने में कठिनाई हो रही है, तो किसी पेशेवर कंप्यूटर तकनीशियन से सहायता लेना सबसे अच्छा है। वे आपके कंप्यूटर की जांच कर सकते हैं और समस्या के कारण का पता लगा सकते हैं।

Gamming PC problems and solutions

 गेमिंग पीसी में होने वाली समस्याएं और उनका समाधान


गेमिंग पीसी एक शक्तिशाली मशीन होती है, लेकिन इसमें कुछ समस्याएं भी आ सकती हैं। इन समस्याओं का समाधान करके आप अपने गेमिंग अनुभव को बेहतर बना सकते हैं।
Gaming PCs can be finicky beasts. Here's a breakdown of common problems and solutions to keep you in the game:


सामान्य समस्याएं और उनके समाधान:

  • पीसी का धीमा चलना:
    • कारण: आपके पीसी में पर्याप्त रैम या स्टोरेज नहीं हो सकता है।
    • समाधान: अपने पीसी में रैम और स्टोरेज को अपग्रेड करें।
  • गेम का क्रैश होना:
    • कारण: गेम के ड्राइवर पुराने हो सकते हैं या गेम में कोई बग हो सकता है।
    • समाधान: गेम के ड्राइवर को अपडेट करें और गेम डेवलपर से संपर्क करें।
  • पीसी का गर्म होना:
    • कारण: आपके पीसी में पर्याप्त कूलिंग नहीं हो सकती है।
    • समाधान: अपने पीसी में अधिक कूलिंग पंखे लगाएं या लिक्विड कूलिंग का उपयोग करें।
  • ग्राफिक्स कार्ड की समस्या:
    • कारण: ग्राफिक्स कार्ड के ड्राइवर पुराने हो सकते हैं या ग्राफिक्स कार्ड में कोई खराबी हो सकती है।
    • समाधान: ग्राफिक्स कार्ड के ड्राइवर को अपडेट करें या ग्राफिक्स कार्ड को बदलें।
  • ऑडियो समस्या:
    • कारण: ऑडियो ड्राइवर पुराने हो सकते हैं या ऑडियो डिवाइस में कोई खराबी हो सकती है।
    • समाधान: ऑडियो ड्राइवर को अपडेट करें या ऑडियो डिवाइस को बदलें।

कुछ अन्य समस्याएं और उनके समाधान:

  • इंटरनेट कनेक्टिविटी समस्या:
    • कारण: आपका इंटरनेट कनेक्शन धीमा हो सकता है या आपके राउटर में कोई समस्या हो सकती है।
    • समाधान: अपने इंटरनेट कनेक्शन की गति बढ़ाएं या अपने राउटर को रीस्टार्ट करें।
  • गेम इंस्टॉलेशन समस्या:
    • कारण: गेम फ़ाइलें दूषित हो सकती हैं या आपके पीसी में पर्याप्त जगह नहीं हो सकती है।
    • समाधान: गेम को दोबारा डाउनलोड करें या अपने पीसी में जगह खाली करें।
  • गेम सेटिंग समस्या:
    • कारण: गेम की सेटिंग आपके पीसी के अनुकूल नहीं हो सकती हैं।
    • समाधान: गेम की सेटिंग को अपने पीसी के अनुकूल बनाएं।

1. Performance Issues

  • Problem: Low FPS, stuttering, or lag.
    • Solutions:
      • Update drivers: Ensure your graphics card (NVIDIA or AMD) and other hardware have the latest drivers.  
      • Optimize game settings: Lower graphics settings in-game to match your hardware's capabilities.
      • Close background applications: Free up resources by closing unnecessary programs running in the background.
      • Check temperatures: Use monitoring software (like MSI Afterburner) to ensure your CPU and GPU aren't overheating. Clean your PC and improve airflow if needed.  
      • Upgrade hardware: If your components are outdated, consider upgrading your GPU, CPU, or RAM.  

2. Overheating

  • Problem: PC shuts down or performance throttles due to high temperatures.
    • Solutions:
      • Clean your PC: Dust buildup can insulate components and prevent proper cooling. Use compressed air to clean fans, heatsinks, and vents.  
      • Improve airflow: Ensure your PC case has adequate ventilation. Add fans if necessary.  
      • Reapply thermal paste: If you're comfortable, replacing the thermal paste on your CPU and GPU can improve heat transfer.  
      • Upgrade cooling: Consider a more powerful air cooler or a liquid cooling solution for your CPU.
     

3. Crashes and Blue Screens

  • Problem: Games crash or your PC displays a Blue Screen of Death (BSOD).
    • Solutions:
      • Check for updates: Ensure your game and operating system are up-to-date.  
      • Verify game files: Use the game platform's built-in tool to check for corrupted game files.
      • Run memory diagnostics: Use Windows Memory Diagnostic to check for faulty RAM.  
      • Check hard drive health: Use a tool like CrystalDiskInfo to monitor your hard drive for errors.  
      • Reinstall Windows: If all else fails, a fresh Windows installation can resolve software conflicts.  

4. Display Issues

  • Problem: No display, distorted image, or flickering.
    • Solutions:
      • Check connections: Ensure your monitor cables are securely connected to both your PC and monitor.
      • Test with a different cable/monitor: Rule out a faulty cable or monitor.
      • Reseat GPU: Remove and reinsert your graphics card to ensure a proper connection.
      • Check GPU drivers: Outdated or corrupted drivers can cause display issues.  
      • Reset BIOS: In some cases, resetting your BIOS to default settings can resolve display problems.  

5. Network Problems

  • Problem: High ping, lag, or connection drops in online games.
    • Solutions:
      • Check your internet connection: Run a speed test to ensure your internet speed is sufficient.
      • Restart your router/modem: This can often resolve temporary network glitches.  
      • Use a wired connection: Ethernet cables provide more stable connections than Wi-Fi.  
      • Update network drivers: Ensure your network adapter has the latest drivers.
      • Close background applications: Programs using the internet can consume bandwidth.
     

General Tips

  • Keep your PC clean: Dust is the enemy of performance and cooling.  
  • Regularly update software: Updates often include bug fixes and performance improvements.  
  • Monitor your PC's health: Use monitoring tools to keep an eye on temperatures, fan speeds, and hardware health.  
  • Back up your data: In case of a hardware failure, you don't want to lose your game saves and other important files.                                                                                                                
      अतिरिक्त सुझाव:
    • अपने पीसी को नियमित रूप से साफ करें।
    • अपने पीसी को वायरस से सुरक्षित रखें।
    • अपने पीसी के सभी ड्राइवरों को अपडेट रखें।
    • गेमिंग के लिए उच्च गुणवत्ता वाले हार्डवेयर का उपयोग करें।

    मुझे उम्मीद है कि यह ब्लॉग आपके लिए उपयोगी होगा। 
TECH FREELANCER

Duel SCREEN

 डुअल स्क्रीन


आजकल, बहुत से लोग एक साथ कई काम करते हैं। वे ईमेल पढ़ते हैं, सोशल मीडिया पर अपडेट करते हैं, और ऑनलाइन वीडियो देखते हैं। इन सभी गतिविधियों के लिए, एक बड़ी स्क्रीन का होना बहुत मददगार होता है। यही कारण है कि डुअल स्क्रीन सेटअप इतना लोकप्रिय हो रहा है।

डुअल स्क्रीन सेटअप में, आपके पास दो मॉनिटर होते हैं जो एक साथ काम करते हैं। यह आपको एक स्क्रीन पर एक काम करने और दूसरी स्क्रीन पर दूसरा काम करने की अनुमति देता है। उदाहरण के लिए, आप एक स्क्रीन पर ईमेल पढ़ सकते हैं और दूसरी स्क्रीन पर एक रिपोर्ट लिख सकते हैं।

डुअल स्क्रीन सेटअप के कई फायदे हैं। सबसे पहले, यह आपकी उत्पादकता को बढ़ा सकता है। जब आपके पास दो स्क्रीन होती हैं, तो आप एक साथ अधिक काम कर सकते हैं। दूसरा, यह आपके काम को अधिक आरामदायक बना सकता है। जब आपके पास एक बड़ी स्क्रीन होती है, तो आपको अपनी गर्दन को इधर-उधर नहीं घुमाना पड़ता है। तीसरा, यह आपके काम को अधिक मनोरंजक बना सकता है। जब आपके पास दो स्क्रीन होती हैं, तो आप एक साथ कई अलग-अलग चीजें कर सकते हैं।

यदि आप डुअल स्क्रीन सेटअप का उपयोग करने में रुचि रखते हैं, तो आपको कुछ बातों पर विचार करना होगा। सबसे पहले, आपको यह सुनिश्चित करना होगा कि आपके पास दो मॉनिटर हैं। दूसरा, आपको यह सुनिश्चित करना होगा कि आपके पास एक कंप्यूटर है जो दो मॉनिटर का समर्थन करता है। तीसरा, आपको यह सुनिश्चित करना होगा कि आपके पास दो मॉनिटर को जोड़ने के लिए आवश्यक केबल हैं।

एक बार जब आपके पास ये सब चीजें हो जाती हैं, तो आप डुअल स्क्रीन सेटअप का उपयोग करना शुरू कर सकते हैं। सबसे पहले, आपको अपने कंप्यूटर को दो मॉनिटर से कनेक्ट करना होगा। फिर, आपको अपने कंप्यूटर को यह बताना होगा कि आप दो मॉनिटर का उपयोग करना चाहते हैं। एक बार जब आप यह कर लेते हैं, तो आप डुअल स्क्रीन सेटअप का उपयोग करना शुरू कर सकते हैं।


डुअल स्क्रीन सेटअप एक शक्तिशाली उपकरण है जो आपकी उत्पादकता को बढ़ा सकता है, आपके काम को अधिक आरामदायक बना सकता है, और आपके काम को अधिक मनोरंजक बना सकता है। यदि आप एक साथ कई काम करते हैं, तो डुअल स्क्रीन सेटअप आपके लिए एक अच्छा विकल्प हो सकता है।

यहां कुछ अतिरिक्त सुझाव दिए गए हैं जो आपको डुअल स्क्रीन सेटअप का अधिकतम लाभ उठाने में मदद कर सकते हैं:

  • अपने मॉनिटर को इस तरह से व्यवस्थित करें कि वे आपकी आंखों के लिए आरामदायक हों।
  • अपने सबसे महत्वपूर्ण कार्यों को एक स्क्रीन पर रखें और अपने कम महत्वपूर्ण कार्यों को दूसरी स्क्रीन पर रखें।
  • विभिन्न कार्यों के लिए विभिन्न स्क्रीन का उपयोग करें।
  • डुअल स्क्रीन सेटअप का उपयोग करके अपने काम को स्वचालित करें।

लैपटॉप से ड्यूल स्क्रीन का उपयोग करने के लिए, आपको कुछ चीजों की आवश्यकता होगी:

  • एक लैपटॉप जिसमें एक अतिरिक्त मॉनिटर को जोड़ने के लिए पोर्ट हो।
  • एक अतिरिक्त मॉनिटर।
  • मॉनिटर को लैपटॉप से जोड़ने के लिए केबल।

एक बार जब आपके पास ये चीजें हो जाती हैं, तो आप इन चरणों का पालन करके ड्यूल स्क्रीन का उपयोग कर सकते हैं:

  1. अपने लैपटॉप और मॉनिटर को केबल का उपयोग करके कनेक्ट करें।
  2. अपने लैपटॉप को चालू करें।
  3. विंडोज में, डेस्कटॉप पर राइट-क्लिक करें और "डिस्प्ले सेटिंग्स" चुनें।
  4. "मल्टीपल डिस्प्ले" अनुभाग में, "एक्सटेंड दीज डिस्प्ले" चुनें।
  5. "अप्लाई" पर क्लिक करें।

Configure your display settings:

  • Windows:
    • Right-click on your desktop and select "Display settings".
    • You should see representations of your screens. Click "Identify" to figure out which number corresponds to which screen.
    • Under "Multiple displays," you can choose how to use the extra screen(s):
      • Extend these displays: This makes your screens act as one big workspace. You can drag windows between them.
      • Duplicate these displays: This mirrors your laptop screen on the other monitor, useful for presentations.  
      • Show only 1/2: This lets you choose which screen to use.
    • You can rearrange the virtual screens to match your physical setup by dragging them in the display settings.  
    • You can also set the resolution and orientation for each screen individually.  
  • macOS:
    • Go to the Apple menu > System Preferences > Displays.
    • Similar to Windows, you'll see arrangements of your screens. You can drag them to match your physical setup.
    • The "Arrangement" tab lets you choose between mirroring or extending your displays.
    • You can adjust resolution and other settings for each display in their respective tabs.

अब आपके पास दो स्क्रीन होंगी जिनका आप एक साथ उपयोग कर सकते हैं। आप एक स्क्रीन पर काम कर सकते हैं और दूसरी स्क्रीन पर वीडियो देख सकते हैं या अन्य कार्य कर सकते हैं।

यहाँ कुछ अतिरिक्त सुझाव दिए गए हैं जो आपके लिए उपयोगी हो सकते हैं:

  • आप अपने मॉनिटर को अपनी पसंद के अनुसार व्यवस्थित कर सकते हैं।
  • आप प्रत्येक स्क्रीन के लिए अलग-अलग रिज़ॉल्यूशन और ओरिएंटेशन सेट कर सकते हैं।
  • आप कीबोर्ड शॉर्टकट का उपयोग करके स्क्रीन के बीच विंडो को जल्दी से ले जा सकते हैं।

मुझे उम्मीद है कि यह जानकारी आपके लिए उपयोगी होगी।


TECH FREELANCER

Featured Post

HP Ink Tank 5810,5820,419,500,521,570,310, 410 printers

  एचपी इंकटैंक प्रिंटर के बारे में जानकारी एचपी इंकटैंक प्रिंटर, एचपी कंपनी द्वारा निर्मित प्रिंटर की एक श्रृंखला है जो स्याही टैंक प्रणाली ...