Saturday, February 24, 2024

Windows Update Error 0x8007001d


How to Fix Windows Update 

Error 0x8007001d

Have you ever seen the error code 0x8007001d while attempting to install a Windows Update? When the Windows update error 0x8007001d appears, it’s usually due to corrupt system files or outdated drivers.Sometimes you need to fix Windows 11 after updates, but this error typically appears while the update is in progress or shortly after. However, it will stop the ability to continue with the update process.

If you’re experiencing this type of error during a Windows Update, this guide will walk you through steps to fix it.

Run Windows Update Troubleshooter

The first place to start resolving the error is with Windows 11’s built-in update troubleshooter. The utility will search for corrupt Windows Update cache files and other irregularities and fix them automatically.

To run the Windows Update Troubleshooter:

  1. Press the Windows key + I to launch Settings.
  2. Select System from the left column and click the Troubleshoot option on the right.
  3. Select the Other Troubleshooters option from the list.

  4. Locate the Windows Update option and click the Run button.
    5. Wait while the troubleshooter detects problems by navigating the onscreen wizard to fix them. Note that sometimes, a restart will be required to resolve issues it detects.

How to Fix a Slow Windows 11 PC


How to Fix a Slow Windows 11 PC

1. Enable Storage Sense

Over time, files on your PC start piling up on the computer’s drive. Some temporary files become corrupt and can be safely removed to improve the performance of the OS.

Enable the Storage Sense feature to prevent temp and other app and system files from negatively impacting drive performance. The built-in utility automatically removes temp and junk files to improve drive performance.

In addition to setting it to run automatically, you can manually run Storage Sense and free up drive space with Cleanup Recommendations.

2. Disable Startup Apps

The fewer apps you have set to launch during startup will improve boot time and overall performance. If you have several apps set to launch during startup, some take significant time to get going.

Disabling most (or all) startup apps can improve your experience significantly. As you continue adding apps, many will set themselves to run during startup, so monitoring and disabling startup apps on Windows 11 if your system is slow is important.

3. Adjust the Power Plan for Better Performance

Another way to increase the performance of your Windows 11 laptop is by adjusting the power plan. For example, your laptop may feel sluggish while on battery power.

To help negate this, set Power Mode to Best Performance in your battery settings. Note that this setting will drain your battery faster, so you might want to create a custom power plan to balance performance and battery use.

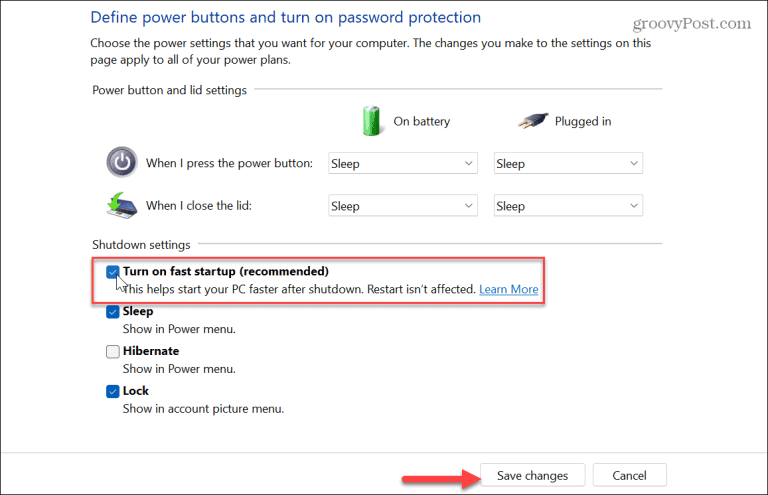
While you’re adjusting the power settings, ensure you enable Fast Startup to make your Windows 11 PC boot faster.

4. Disable Third-Party Services

When you install apps, they include their own services that start when you boot your machine. These are helpful when getting responsive performance while using them. However, they can hurt overall system performance.

You can turn off third-party services that you don’t often use to help fix a slow Windows 11 PC.

To disable third-party services:

  1. Press the Windows key to launch the Start menu.
  2. Type system configuration and choose the top result.
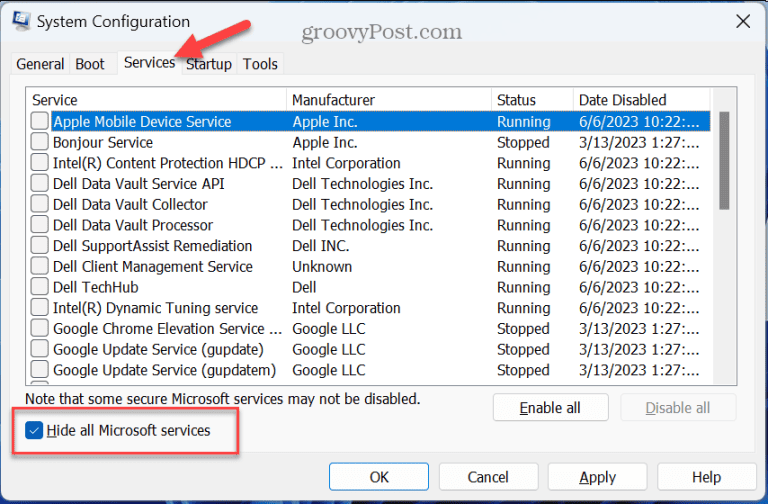
  3. Once the System Configuration window appears, click the Services tab at the top.
  4. Select the Hide all Microsoft services box
  5. Select from the remaining services you don’t use much. For example, if you have more than one browser, you can disable Chrome services if you don’t use it.
  6. Click Apply and OK


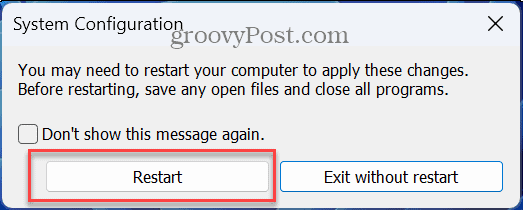
7. You will be prompted to restart Windows 11 to apply the changes

5. Turn Off Animation and Visual Effects

A quick way to fix a slow Windows 11 system is to disable unneeded default visual effects and animations. The look of Windows 11 is elegant, but eye candy isn’t necessary.

Disabling these visual effects takes the pressure off your graphics card or chipset and can help to make Windows 11 more responsive.

To turn off visual animations and effects:

  1. Press the Windows key to launch the Start menu.
  2. Type appearance and select the Adjust the appearance and performance of Windows option
  3. Uncheck the visual effects that you don’t need. Alternatively, select the Adjust for best performance option to turn off all effects and animations.
    Uploading: 102474 of 102474 bytes uploaded.

Once you make your selections, Windows 11 won’t be as visually appealing, but it will be much more responsive. For example, just turning off the Animate windows when minimizing and maximizing and Show windows contents while dragging options will have a remarkable improvement.

6. Keep Windows Updated

Keeping your Windows system up to date is vital to get new features. And it’s also crucial for security, stability, and system performance. Like your other tech devices, Microsoft releases updates for Windows 11 that improve performance.

For example, a new update might make Windows 11 run faster on older hardware.

Windows does a good job of keeping things updated in the background, but if you know there’s a system performance update, you can check for Windows 11 updates manually. Once you install the update, see if the OS is more responsive.


Featured Post

HP Ink Tank 5810,5820,419,500,521,570,310, 410 printers

  एचपी इंकटैंक प्रिंटर के बारे में जानकारी एचपी इंकटैंक प्रिंटर, एचपी कंपनी द्वारा निर्मित प्रिंटर की एक श्रृंखला है जो स्याही टैंक प्रणाली ...