 क्या अपने भी लिया है HP INKTANK PRINTER तो मेरी ये पोस्ट आपके लिए बोहोत उपयोगी है ।
HP Ink Tank Printers
दोस्तों प्रिंटर हमारे लिए ठीक उसी प्रकार जरूरी है जैसे कॉपी के लिए कलम , बिना पेन के हम कॉपी का इस्तेमाल नहीं कर सकते है ठीक वैसे ही कम्प्युटर या लैपटाप मे जिन फ़ाइल को हम सेव करते है उसे papper मे नहीं ले सकते ।
प्रिंटर बनाने वाली कई कंपनी है जिसमे hp के printers को सबसे आगे माना गया है आइए चलते है आज के लेटैस्ट hp प्रिंटर के बारे मे कुछ नया जानने की कोशिस ।
HP INKTANK PRINTER
INKTANK प्रिंटर inkjet printer का latest version hai , इसमे ink को डालने के लिए एक छोटा सा tank का इस्तेमाल किया जाता है जिससे बार बार नए cartidge की जरूरत नहीं पड़ती सिर्फ समय पे इंक ही डाला जाता है । जैसा की फोटो मे आप देख पा रहे है ........................................
 tank के साथ इंक की बोटल
 इसमे इंक भरना काफी आसान है इसके लिए किसी की जरूरत नहीं ये कम खुद से ही कर सकते है ।
आइए जानते है इस प्रिंटर मे किस प्रकार के प्रॉब्लेम्स आते है ...................................................
जितना आसान इसको इस्तेमाल करना है उतना ही आसानी से इसके प्रॉब्लेम्स को सम्झना ओर उसका उपाय भी है ;;;;;;;;;;;;;;;;;;;;;;;;;;;;;;
जब भी इसमे किसी प्रकार का प्रॉब्लेम्स होता है तो इसके डिस्प्ले स्क्रीन मे एक CODE लिखा हुआ आता है

इसमे दो प्रकार के प्रिंटर है एक वाईफाई मे दूसरा बिना वाईफाई के , दोनों की बनावट बिलकुल एक जैसी है बस वाईफाई का अंतर है ओर कंट्रोल pannel का जिसका फोटो ऊपर डाला गया है । कंट्रोल pannel को ठीक से समझ जाने पर इस् प्रिंटर को इस्तेमाल करना ओर आसान हो जाते है ।
जैसा की हम इस प्रिंटर के error code के बारे मे जानकारी लेंगे तो इसके लिए display screen का सहारा लेना पड़ेगा ............................
ERROR CODE
Error 1 ----------- E1 - 'Paper Mismatch' Error (Windows)
सोल्युशंस - Adjust the paper size setting
Step 1
- In the program you want to print from, click File, and then click Print.
- Make sure your printer is in the Name or Printers drop-down list box, and then click Properties, Printer Properties or Preferences.
- Click the Paper/Quality tab.
- Click Advanced, if necessary, and then click Paper Size.
- Select the paper size that matches the size and type of paper loaded in the printer tray, and then click OK. If there are no matching paper sizes, select the size from the list that is closest to the size of the paper loaded in the tray.
- Click OK, and then try to print.
Step 2: Check the paper source setting
Remove and reload the paper in the input trays, and then check the paper source setting.
- Remove all the paper from all the printer input trays.
- Reload the paper, and then adjust the paper width guides so they gently rest against the edge of the paper stack.
- In the program you want to print from, click File, and then click Print.
- Make sure your printer is in the Name or Printers drop-down list box, and then click Properties, Printer Properties or Preferences.
- Click the Paper/Quality tab, and then click Paper Source to select the correct tray.
- Click OK, and then try to print.
If the issue persists, continue to the next step.
Step 3: Reset the printer
Reset the printer to clear any hardware issues or error states.
- With the printer turned on, disconnect the power cord from the printer.
- Unplug the power cord from the power source.
- Wait 60 seconds.
- Reconnect the power cord to a wall outlet and to the printer.
'Error 2' displays

NOTE:
The Error icon ऑफ E 2 + Papper icon ओर resume light blinking
- Press the Cancel button
 to cancel the print job or clear the error.
 - Go to Printing and Changing Print Settings (Windows) or Printing and Changing Print Settings (Mac) for instructions on changing the paper size for your print job.
'Error 3' displays and the Resume light blinks
An E3 error occurs when there is a printer carriage jam.
Go to An 'E3' Error (Carriage Jam) for information to clear a printer carriage jam.
Figure : Number of copies alternates between 'E' and '3,' and the Resume light blinks
अगर ये सारे सोल्युशंस के बाद भी E 3 एर्र डिस्प्ले मे आता है ओर प्रिंटर से धड़ाम धड़ाम आवाज भी तो इस् प्रिंटर का ENCODER STRAP रिप्लेस करना होगा ,या carradge PCB ।
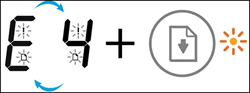
Error 4' displays, and the Paper Error icon, Resume light, and Printhead Alert light blink
An E4 error occurs when there is a paper jam.
Go to 'E4' Error (Paper Jam) for information to clear a paper jam.
Figure : Number of Copies icon alternates between 'E' and '4,' and the Error icon, Paper Error icon, Resume light, and Ink Alert light blink
 अगर सब कुछ ठीक होने के बाद भी सोल्यूशंस ना निकाल रहा है तो इसके लिए papper pickup door sencior replace करना होगा ।
 'Error 5' displays and all lights on the control panel blink
An E5 error occurs when the printer experiences a scanning error.
Figure : The Number of Copies icon alternates between E and 5, and all lights on the control panel blink

Turn the printer off and on again to resolve a scanning error. If you were not scanning when the error occurred, skip to the Service the printer section at the end of this document.
अगर इसके बाद भी प्रोब्लेम होती है तो scanner रिप्लेस किया जाता है ।
The printer still prints even if the scan feature is unavailable.
- Turn off the printer.
- Wait at least 15 seconds.
- Turn on the printer.
- Check the lights on the control panel to make sure they no longer blink.
- Attempt to scan the item again.See Network Scanner Connection is Lost (Windows) or Network Scanner Connection is Lost (Mac) for more information about how to resolve the scanning error for network connections.See USB Scanner Connection is Lost (Windows) or USB Scanner Connection is Lost (Mac) for more information about how to resolve the scanning error for USB connections.
'Error 6' displays and all the lights blink
An E6 error occurs when the printer is in an error state.
Figure : Number of Copies icon alternates between 'E' and '6,' and all the lights blink

Step 1: Reset the printer
Resetting the printer can clear the error state.
- With the printer turned on, disconnect the power cord from the printer.
- Unplug the power cord from the power source.
- Wait 60 seconds.
- Reconnect the power cord to a wall outlet and to the printer.
NOTE:
HP recommends plugging the printer directly into a wall outlet.
Step 2: Plug the printer directly into an electrical outlet
Plug the product directly into an electrical outlet to make sure that the power source functions correctly.
- Disconnect the power cord from the rear of the product.
- Unplug the power cord from any power strips or surge suppressors.
- Plug the power cord directly into an electrical outlet.
- Reconnect the power cord to the rear of the product.
- Press the Power button (
) to turn on the product.
- Try the task again.If the issue persists, try a different electrical outlet.
Step 3: Service the printer
If you have completed all the previous steps and the issue persists, continue to the Service the printer section at the end of this document.
'Error 7' displays
An E7 error occurs when the printer is unable to prime the system and has reached the maximum number of prime attempts.
Figure : Number of Copies icon alternates between 'E' and '7'

For help, contact PC problems and Solutions Deoghar .
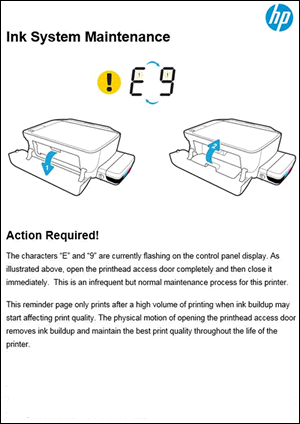
'Error 9' displays and an Ink System Maintenance page prints
An E9 error occurs when the printer detects that ink system maintenance is required. An Ink System Maintenance page prints containing instructions to open and close the printhead access door to resolve the error.
सामने का दोनों door खोलिए ओर फिर बंद कीजिये सिर्फ इतना ही करने से आपकी प्रॉब्लेम्स दूर ।
Number of Copies icon alternates between 'E' and '9'

Figure : Ink System Maintenance page
आशा करता हु की आप सभी पाठको को मेरी ये पोस्ट अच्छी लगी होगी आगे ओर भी जंकारियों के लिए हमेसा जुड़े रहे हमारे साथ ।
https://youtu.be/a3dW-RXI99U Clik link and suchcribe my channel


