Sunday, July 23, 2023

7 Troubleshooting Steps: Fix Common Computer Problems:


1. Start with a Simple Step: Restart

Turn it off, wait a few minutes, turn it back on. Yes, this simple action can solve a lot of computer problems. How? It allows the computer to restart, which restarts a lot of software functions. Believe it or not, that alone may correct the issue you’re having.

2. Virus Scan

What should be an obvious step that is effective and too often overlooked? Get your virus-scanning software fired up to perform the deepest scan with the most thorough process it offers. Then walk away and let it do its thing.

The scan your computer has set up to use automatically may not be a comprehensive scan, the one that will take the longest time and is the one you need. So you’ll want to go to program settings and see what else is available on your computer and make sure it is up-to-date.

3. Software Update

Outdated software can be the crux of computer problems. Your software may be the cause of a ransomware outbreak, keyboard glitches, and more. The good news is that most software updates are automatic, so the simple step of turning your computer off and back on can be the fix you need. These critical software updates are often why your computer shuts down unexpectedly too. When your computer is acting up, it may be telling you it needs to run updates, so let it.

4. Debloat Your Computer

Do you have programs loaded on the computer that you haven’t used in a long time, or maybe never? Those are taking up space in your hard drive, making your operating system work harder, breaking up your files, and spreading your files out, which is using up storage space on your computer. Things you can do to help de-bloat your computer:

  • Uninstall applications that you don’t need by looking in the apps section. The apps section is found in ‘settings’ for Windows or macOS; just drag the app shortcut to the trash.
  • Delete unneeded, unwanted add-on extensions in your browser.
  • Clean out your unneeded files like movies and files.

5. Wi-Fi Connection

If your problems are with the Internet, there are three troubleshooting things to try:

  • Right-clicking on the Internet connection icon located in the taskbar and select the troubleshoot option. Your computer will run a diagnostic test and display any problems with possible solutions.
  • If that didn’t help, plug your desktop or laptop directly into your router using an Ethernet cable.
  • If that doesn’t help, restart the router by turning it off and back on.

If there still isn’t any internet connection and nothing else is getting any Wi-Fi, like your cell phone or tablet, then you need to contact your provider. The problem could be a router hardware problem, or your internet provider is having issues.

The Internet may not be the problem, though. If you’re getting a message that the drive or location cannot be found or isn’t recognized, this could be a corrupted drive or a disconnect with external drives. Unplug and re-plug in those drives to see if that helps. You can also replace your cables which can wear out over time.


6. Operating System Reinstalled

Sometimes, just starting over from scratch is needed, meaning reinstall your Windows or macOS. That action will clear any programs causing trouble, erase malware, viruses, and reset the internet connection settings. By doing this, you are getting a new starting point, so make sure you have backed up all your data first.


7. Go Beyond Those Basics

To identify a problem, you need to understand what is happening or not happening first. An essential first step is to replicate the issue. That step will possibly help you identify the specific problem. For example, if the software is freezing up or crashing when you’re working in a particular mode, make a note of that for a reference point when you start your troubleshooting steps.

Errors can happen when we are using multiple functions or programs. Locating the issue can be challenging to locate, so we need to isolate the components or factors and test them. For instance, if you have Adobe Premiere running the same time another program is running when the problem happens, then it could be one of those programs causing the problem. Running each of those programs separately may tell you what is causing the problem.

Saturday, May 14, 2022

Whatsapp Tricks


Top 11 Whatsapp Tricks Hacks That You Should Know

आज हम कुछ महत्वपूर्ण WhatsApp ट्रिक्स हैक्स शेयर करने जा रहे हैं जो आपको पता होने चाहिए। हो सकता है कि आप पहले से ही कुछ तरकीबें जानते हों और हो सकता है कि कुछ तरकीबें आपके लिए नई हों इसलिए कृपया पूरा लेख पढ़ें और अपने फोन में इन व्हाट्सएप tips का उपयोग करें। 
आप नहीं चाहते कि कोई व्यक्ति आपकी चैट देखे? 
क्या आप अंत में अपनी संपर्क सूची पर ध्यान नहीं देना पसंद करते हैं?

1.   Becoming invisible in WhatsApp


अगर आप नहीं चाहते कि हर कोई आपको ऑनलाइन देखे या आपकी status , image  या account info की जांच करे, तो निम्न व्हाट्सएप ट्रिक का उपयोग करें:

Android के लिए: Go to Menu > Settings > Account > Privacy. Change the settings of personal data visibility.

  • For iOS: Go to Settings, and open the Privacy tab. Then change your settings there.


2.    Highlighting messages

संदेश भेजने के लिए हमारी पसंदीदा व्हाट्सएप चैट ट्रिक में से एक। आप न केवल emoji के साथ बल्कि बोल्ड टाइप, इटैलिक और स्ट्राइकथ्रू के साथ जो लिखते हैं उस पर आप उच्चारण कर सकते हैं।
  • If you want your message in italics, write the underscore signs on both sides of your _text_.
  • Want the message in bold type? Use the star key on both sides of the *text*.
  • If you want the strikethrough type, use twiddles on both sides of the |message|.

3.    Sending a group message without making a group chat


संदेश आपके द्वारा चुने गए प्रत्येक रिसीवर को दिया जाएगा। साथ ही, सभी आवश्यक संपर्कों को संदेश सामान्य तरीके से मिलेगा। उनके उत्तर केवल आपको ही दिखाई देंगे, सूची के अन्य संपर्कों को नहीं। मेलआउट बनाने के लिए, चैट > मेनू > नया प्रसारण पर जाएं। "+" दबाएं या रिसीवर के नाम दर्ज करें। यह हमारा व्यक्तिगत रूप से पसंदीदा व्हाट्सएप चैट ट्रिक्स हैक भी है


4.    How to understand that you are blocked


There are several signs of being blocked in some chats:

  • You don’t see the time a contact was last seen online.
  • You don’t see new avatar pics in the profile of a contact.
  • All your messages are ticked once (the message is sent) but not twice (the message is delivered).
  • You create a group chat, but you can’t add a contact (that probably means you are blocked). However,

all these WhatsApp tricks hacks signs don’t guarantee that you are 100% banned. Your contact might have changed the visibility settings.


5.   Saving the storage capacity from auto downloading

व्हाट्सएप एक देखभाल करने वाला एप्लिकेशन है और चैट करते समय भेजे गए आपके सभी मीडिया को स्वचालित रूप से सहेजता है। लेकिन बहुत बार यह आपके स्मार्टफोन के मेमोरी स्टोरेज को "खा जाता है", और आप एक नया कूल ऐप इंस्टॉल करने से नहीं चूकना चाहेंगे। निर्णय काफी सरल है: ऐप सेटिंग में मीडिया ऑटोसेव को बंद करें।


  • For Android: go to Settings > Data Usage, and choose the necessary parameters of file downloading.
  • For iOS: Settings > Data and Storage Usage > Media.

This Whatsapp trick will save your phone storage.

6.   Identifying a fake contact

Almost everyone can use a “free number” or a special app for SMS activation messages. Just try to call the contact if you want to check if it’s a bot. Temporary (“free”) virtual numbers are practically always offline or inactive.

 7.How to find important messages quickly 

Sometimes you search for a specific important message for hours. Please don’t waste your time: choose the news, and star it (the star sign in the upper part of the screen). Now it can be quickly found in the “Starred messages” tab in the main menu.

  • Open the Menu, and press WhatsApp Web.
  • Suppose the app invites you to follow the web.WhatsApp link, scan the QR code, and use WhatsApp on your PC.
  • It’s good. It means that nobody else reads your WhatsApp from their PC using WhatsApp Web.
  • If you see a “Computers” tab and a list of open sessions (connections), which have nothing to do with your WhatsApp activity, it’s a reason to get worried.

This can signal that someone else is reading your chats and profile.


importaint links


JOIN MY FACEBOOK 

https://fb.watch/c-5Y4r_YGf/

FB pe pucho

Techno Er Onkar  click link to my channel and suchcribe

support me 


Thursday, May 12, 2022

make files open with right apps

CHAPTER 3  


Change default programs in Windows

  1. Select Start > Settings > Apps > Default apps.
  2. To change the default app, you can do either of the following: Set a default for a file type or link type. In the search bar, enter the file type or link type you want, then select it from the list of results.

Opening files with different applications

To open a file in a different application:

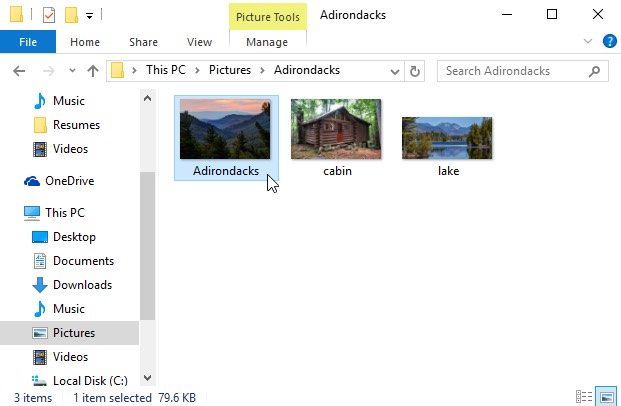
Sometimes you may want to open a file in a different application without changing the default. For example, you may want to open a photo with Microsoft Paint to crop or resize it.

  1. From the desktop, right-click the desired file.
    right-click a file
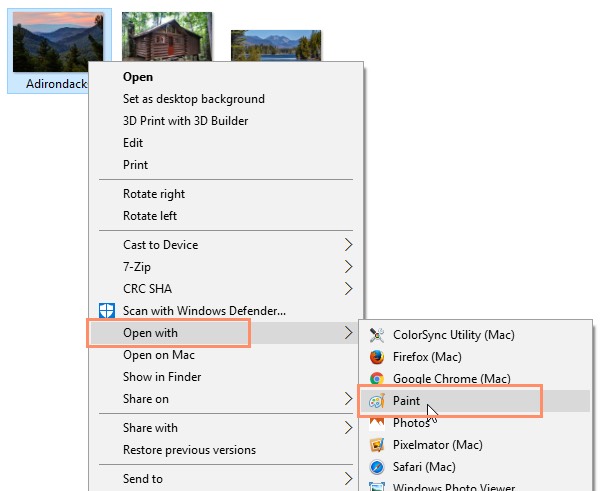
  2. From the drop-down menu, click Open with, then select the desired application. In this example, we'll select Paint.
    open with a different application
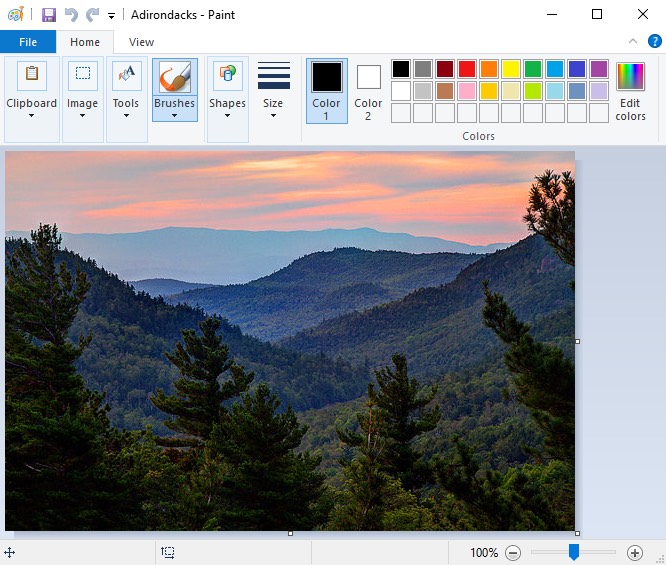
  3. The file will open in the selected application.
    file opens in the selected application

To change the default application:

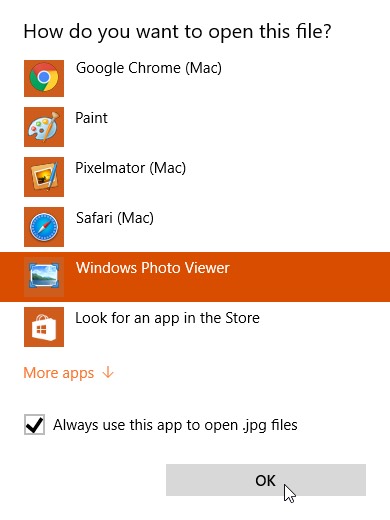
You may prefer to change the default application for certain types of files so they'll always open in the new app when you double-click them. For example, you may want your photos to always open in Windows Photo Viewer instead of the Photos application.

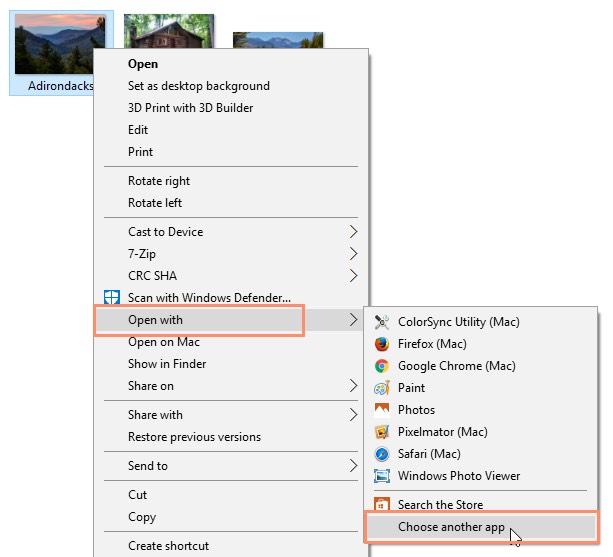
  1. From the desktop, right-click the desired file, select Open with, and click Choose another app from the menu that appears.
    open with another application
  2. Select the desired application. If you don't see the one you want, click More apps or Look for an app in the Store to look for other applications. In this example, we want to open the file in Windows Photo Viewer. Then check off Always use this app to open .jpg files and click OK.
    choosing Windows Photo Viewer
  3. The file will open in the new application. The next time you double-click a file of that type, it will open in the new default application.
    file opens in a different application


remove annoying pop up ads in microsoft edge browser

 CHAPTER 4 


Remove annoying pop up ads in microsoft edge browser

 Block pop-ups in Microsoft Edge

  1. In the new Microsoft Edge , go to Settings and more > Settings > Cookies and site permissions.
  2. Select Pop-ups and redirects.
  3. Move the Block (recommended) toggle to On.

Google Chrome और Microsoft Edge ब्राउजर को अपडेट करने से आ रहा है Virus, इन बातों का रखें खास ख्याल 


Google Chrome And Microsoft Edge Virus: अगर आप भी गूगल क्रोम (Google Chrome) और माइक्रोसॉफ्ट एज (Microsoft Edge)ब्राउजर का उपयोग कर रहे हैं तो सावधान हो जाइए. स्कैमर्स ने अब यूजर्स को ठगने का एक नया तरीका निकाला है.

Google Chrome And Microsoft Edge Virus: गूगल क्रोम और माइक्रोसॉफ्ट एज ब्राउजर का उपयोग करने वाले यूजर्स को खास सावधान रहने की जरूरत है. पिछले कुछ दिनों से क्रोम और एज पर स्कैम (scam) चल रहा है. यूजर्स के पास ब्राउजर को अपडेट करने के मैसेज आ रहे हैं. साइबर क्रिमिनल (cyber criminal) अपडेट के नाम से ये स्कैम कर रहे हैं. इसको अपडेट करते  ही डिवाइस में एक रैंसमवेयर  (Ransomware) जगह बना लेता है, और फिर आपके पर्सनल डेटा को मिसयूज कर रहा है.

क्या होता है Magniber Ransomware


मैग्निबर एक बेहद खतरनाक वायरस है जो कि, आपके सिस्टम में ब्राउजिंग के दौरान दूसरे ,मालवेयर भी डाउनलोड कर लेता है. जब आपके पास ब्राउजर पर अपडेट के लिए मैसेज आता है और आप इसे एक्सेप्ट करते हैं तो आपके सिस्टम में एक .appx फाइल डाउनलोड हो जाती है. यही बैकग्राउंड में एक्टिव हो कर फाइल और सिस्टम को नुकसान पहुंचाती है.

ऐसे करें बचाव 


1. अपने सिस्टम में मौजूद क्रोम ब्राउजर (Chrome Browser) और एज ब्राउजर को अपडेट करने से बचें. ये खुद ही अपडेट हो जाते हैं. अलग से किसी पॉप-अप के द्वारा इन्हें अपडेट ना करें.

2. अपना सभी जरूरी डेटा समय-समय पर सेव करते रहें. एक हार्ड ड्राइव में सभी डेटा का बैकअप रखें.

3. आपका जरूरी डेटा पहले से सुरक्षित होगा तो क्रिमिनल आपको डेटा के लिए ब्लैकमेल नहीं कर पाएंगे. 

4. सिस्टम में हमेशा एक अच्छा Antivirus सॉफ्टवेयर डाल कर रखें. 


Can't upgrade to the latest Windows 10 version


Troublshooting of Laptop/pc hang

HP Ink Tank Printers Error Codes


  क्या अपने भी लिया है HP INKTANK PRINTER तो मेरी ये पोस्ट आपके लिए बोहोत उपयोगी है । 

HP Ink Tank  Printers

दोस्तों प्रिंटर हमारे लिए ठीक उसी प्रकार जरूरी है जैसे कॉपी के लिए कलम , बिना पेन के हम कॉपी का इस्तेमाल नहीं कर सकते है ठीक वैसे ही कम्प्युटर या लैपटाप मे जिन फ़ाइल को हम सेव करते है उसे papper मे नहीं ले सकते । 
प्रिंटर बनाने वाली कई कंपनी है जिसमे hp के printers को सबसे आगे माना गया है आइए चलते है आज के लेटैस्ट hp प्रिंटर के बारे मे कुछ नया जानने की कोशिस । 

HP INKTANK PRINTER 
 
INKTANK प्रिंटर inkjet printer का latest version hai , इसमे ink को डालने के लिए एक छोटा सा tank का इस्तेमाल किया जाता है जिससे बार बार नए cartidge की जरूरत नहीं पड़ती सिर्फ समय पे इंक ही डाला जाता है । जैसा की फोटो मे आप देख पा रहे है ........................................
tank के साथ इंक की बोटल 

इसमे इंक भरना काफी आसान है इसके लिए किसी की जरूरत नहीं ये कम खुद से ही कर सकते है । 


आइए जानते है इस प्रिंटर मे किस प्रकार के प्रॉब्लेम्स आते है ...................................................


जितना आसान इसको इस्तेमाल करना है उतना ही आसानी से इसके प्रॉब्लेम्स को सम्झना ओर उसका उपाय भी है ;;;;;;;;;;;;;;;;;;;;;;;;;;;;;;

जब भी इसमे किसी प्रकार का प्रॉब्लेम्स होता है तो इसके डिस्प्ले स्क्रीन मे एक CODE  लिखा हुआ आता है 
  1. Control panel display
  2. Cancel button
  3. Wireless button/light
  4. Wi-Fi Direct button/status light
  5. Start Copy Color button
  6. Power button/light
  7. Printhead Alert light
  8. Resume button/light
  9. Information button/light
  10. HP ePrint button/light
  11. Start Copy Black button


इसमे दो प्रकार के प्रिंटर है एक वाईफाई मे दूसरा बिना वाईफाई के , दोनों की बनावट बिलकुल एक जैसी है बस वाईफाई का अंतर है ओर कंट्रोल pannel का जिसका फोटो ऊपर डाला गया है । कंट्रोल pannel को ठीक से समझ जाने पर इस् प्रिंटर को इस्तेमाल करना ओर आसान हो जाते है । 

जैसा की हम इस प्रिंटर के error code के बारे मे जानकारी लेंगे तो इसके लिए display screen का सहारा लेना पड़ेगा ............................

ERROR CODE 


                      Error 1 -----------   E1  - 'Paper Mismatch' Error (Windows)

        सोल्युशंस - Adjust the paper size setting

Step 1

  1. In the program you want to print from, click File, and then click Print.
  2. Make sure your printer is in the Name or Printers drop-down list box, and then click PropertiesPrinter Properties or Preferences.
  3. Click the Paper/Quality tab.
  4. Click Advanced, if necessary, and then click Paper Size.
  5. Select the paper size that matches the size and type of paper loaded in the printer tray, and then click OK. If there are no matching paper sizes, select the size from the list that is closest to the size of the paper loaded in the tray.
  6. Click OK, and then try to print.

    Step 2: Check the paper source setting

Remove and reload the paper in the input trays, and then check the paper source setting.
  1. Remove all the paper from all the printer input trays.
  2. Reload the paper, and then adjust the paper width guides so they gently rest against the edge of the paper stack.
  3. In the program you want to print from, click File, and then click Print.
  4. Make sure your printer is in the Name or Printers drop-down list box, and then click PropertiesPrinter Properties or Preferences.
  5. Click the Paper/Quality tab, and then click Paper Source to select the correct tray.
  6. Click OK, and then try to print.
If the issue persists, continue to the next step.

Step 3: Reset the printer

Reset the printer to clear any hardware issues or error states.
  1. With the printer turned on, disconnect the power cord from the printer.
  2. Unplug the power cord from the power source.
  3. Wait 60 seconds.
  4. Reconnect the power cord to a wall outlet and to the printer.
NOTE: 
The Error icon ऑफ E 2 + Papper icon ओर resume light blinking 

  1. Press the Cancel button  to cancel the print job or clear the error.
  2. Go to Printing and Changing Print Settings (Windows) or Printing and Changing Print Settings (Mac) for instructions on changing the paper size for your print job.                            

An E3 error occurs when there is a printer carriage jam.Image: Carriage jam light pattern
Go to An 'E3' Error (Carriage Jam) for information to clear a printer carriage jam.
Figure : Number of copies alternates between 'E' and '3,' and the Resume light blinks
अगर ये सारे सोल्युशंस के बाद भी E 3 एर्र डिस्प्ले मे आता है ओर प्रिंटर से धड़ाम धड़ाम आवाज भी तो इस् प्रिंटर का ENCODER STRAP रिप्लेस करना होगा ,या carradge PCB । 


An E4 error occurs when there is a paper jam.
Go to 'E4' Error (Paper Jam) for information to clear a paper jam.
Figure : Number of Copies icon alternates between 'E' and '4,' and the Error icon, Paper Error icon, Resume light, and Ink Alert light blink
Image: Paper Jam light pattern अगर सब कुछ ठीक होने के बाद भी सोल्यूशंस ना निकाल रहा है तो इसके लिए papper pickup door sencior replace करना होगा । 
An E5 error occurs when the printer experiences a scanning error.
Figure : The Number of Copies icon alternates between E and 5, and all lights on the control panel blink
Image: Scan error
Turn the printer off and on again to resolve a scanning error. If you were not scanning when the error occurred, skip to the Service the printer section at the end of this document.
अगर इसके बाद भी प्रोब्लेम होती है तो scanner रिप्लेस किया जाता है । 
NOTE: 
The printer still prints even if the scan feature is unavailable.
  1. Turn off the printer.
  2. Wait at least 15 seconds.
  3. Turn on the printer.
  4. Check the lights on the control panel to make sure they no longer blink.
  5. Attempt to scan the item again.
    See Network Scanner Connection is Lost (Windows) or Network Scanner Connection is Lost (Mac) for more information about how to resolve the scanning error for network connections.
    See USB Scanner Connection is Lost (Windows) or USB Scanner Connection is Lost (Mac) for more information about how to resolve the scanning error for USB connections.
An E6 error occurs when the printer is in an error state.
Figure : Number of Copies icon alternates between 'E' and '6,' and all the lights blink
Image: Error state light pattern

Step 1: Reset the printer

Resetting the printer can clear the error state.
  1. With the printer turned on, disconnect the power cord from the printer.
  2. Unplug the power cord from the power source.
  3. Wait 60 seconds.
  4. Reconnect the power cord to a wall outlet and to the printer.
    NOTE: 
    HP recommends plugging the printer directly into a wall outlet.

Step 2: Plug the printer directly into an electrical outlet

Plug the product directly into an electrical outlet to make sure that the power source functions correctly.
  1. Disconnect the power cord from the rear of the product.
  2. Unplug the power cord from any power strips or surge suppressors.
  3. Plug the power cord directly into an electrical outlet.
  4. Reconnect the power cord to the rear of the product.
  5. Press the Power button () to turn on the product.
  6. Try the task again.
    If the issue persists, try a different electrical outlet.

Step 3: Service the printer

If you have completed all the previous steps and the issue persists, continue to the Service the printer section at the end of this document.

An E7 error occurs when the printer is unable to prime the system and has reached the maximum number of prime attempts.
Figure : Number of Copies icon alternates between 'E' and '7'
Image: Maximum number of primes allowed light pattern
For help, contact PC problems and Solutions Deoghar .

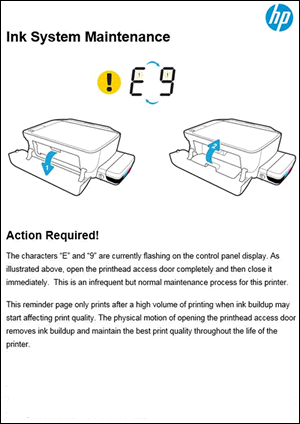
An E9 error occurs when the printer detects that ink system maintenance is required. An Ink System Maintenance page prints containing instructions to open and close the printhead access door to resolve the error. 

सामने का दोनों door खोलिए ओर फिर बंद कीजिये सिर्फ इतना ही करने से आपकी प्रॉब्लेम्स दूर । 
Number of Copies icon alternates between 'E' and '9'
Ink System Maintainence error
Figure : Ink System Maintenance page
Ink System Maintenance page
आशा करता हु की आप सभी पाठको को मेरी ये पोस्ट अच्छी लगी होगी आगे ओर भी जंकारियों के लिए हमेसा जुड़े रहे हमारे साथ । 


Featured Post

Microsoft Windows में ransomware protection

  Microsoft Windows में ransomware protection Microsoft Windows में ransomware protection एक महत्वपूर्ण सुरक्षा सुविधा है जो आपके डेटा को ख...